How to seamlessly deploy and rollout your company’s email signature
Mar 16 2025

A well-crafted email signature enhances your brand’s identity and provides essential contact details in a professional manner. Closing an email signature project efficiently ensures that all users within your organization have a consistent and visually appealing email signature. Here’s a step-by-step guide to completing the process successfully.
Why this matters
This is a project that typically involves both IT and Marketing teams to confirm and prepare simple steps. Once set up, email signatures update automatically for all users. The Marketing team can take control of how email signatures represent the brand, drive engagement, and create new opportunities in every email. Your email signature is your company’s digital ambassador. Just imagine how many emails your organization sends daily compared to website visits—your email signature carries a powerful branding message that should not be overlooked in today’s digital landscape.
1. Choose the right subscription plan
Start by selecting a subscription plan that best aligns with your company’s objectives. The subscription can be updated in increments of 5.
- Monthly Subscription Plan – Flexible option with no long-term commitment.
- Annual Subscription Plan – Offers special discounts for yearly commitment.
We also provide great customer support throughout your subscription to help you maximize its value.
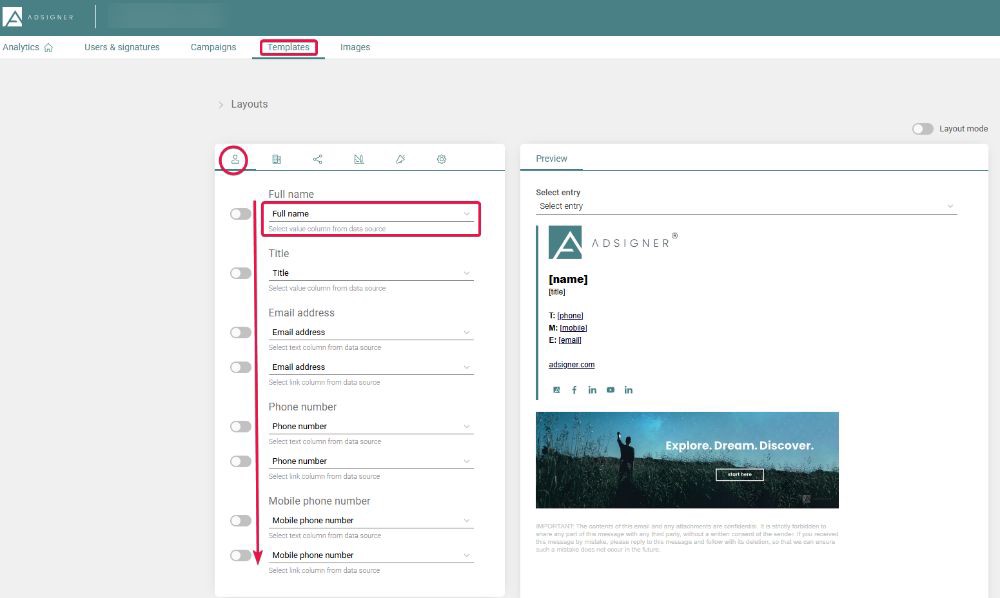
2. Users & signatures - gather user data
Before setting up email signatures, collect all necessary user details to ensure accuracy and completeness. Here’s what you need:
- Full name
- Email address
- Mobile phone number
- Direct line
- Booking & demo Links (if applicable)
User data can be imported via an Excel sheet HERE or synchronized using Azure Active Directory (Microsoft Entra ID) or Google Workspace:
- Navigate to Users & signatures
- Click on the three dots in the top right corner next to (+)Add user
- Select Data source & automation
- Go to Data sources > Connect sources (Entra ID / Google Workspace / JSON file)

3. Templates - prepare and configure your template
3a. Branding and design elements
A professional email signature should reflect your corporate branding. Ensure you have the following assets ready:
- Company logo (High-resolution PNG format in different layouts)
- Relevant social media icons (Linked to official profiles)
If you need a custom email signature design, you can order a custom template HERE. Simply provide a mock-up, and our team will program the design for you within three working days after the order has been successfully processed and settled.
3b. Define company information
Make sure the email signature design includes all necessary company details, such as:
- Company name
- Company address
- Social media icons (if applicable)
- Corporate colors
- Call-to-action (CTA) links (e.g., booking & demo links)
Once these details are in place, the email signature template can be configured to pull individual user information from the Users & signature table.
4. Deploy the signature for your team
For organizations using New Outlook, deploy the AdSigner Outlook add-in 12 hours before the signature rollout. This ensures a smooth initial setup and automatic signature updates for all users.
When satisfied with the final email signature template, follow these steps to set it as the default:
- Go to Templates > edit template
- Click on the Settings icon
- Check the box “Generate signatures automatically”
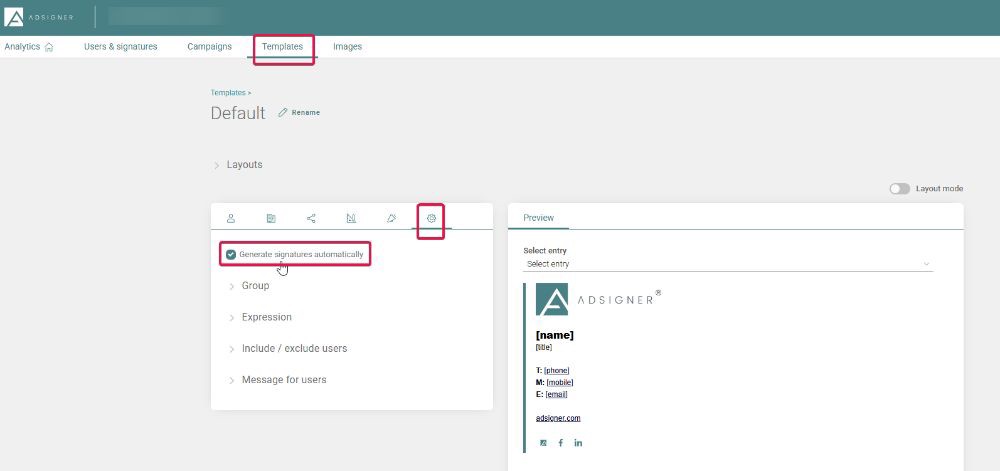
This ensures that the selected template will be automatically generated for all users, including any new users added to the organization.
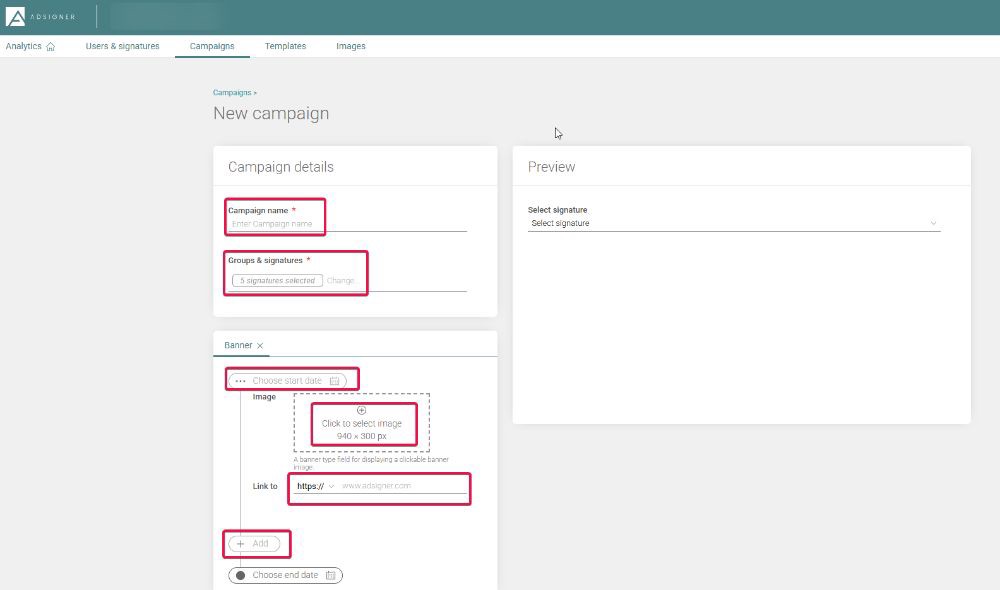
5. Campaigns - set up a campaign banner
Campaign banners are a great way to communicate messages, promotions, or updates through your email signatures. To set up a campaign:
- Navigate to Campaign > create campaign
- Name the campaign
- Select which email signature to target – either everyone in the organization or a specific group (defined in Users & Signatures “Group”)
- Upload a banner (Standard dimensions: 940 x 300 px in PNG, JPG, or GIF format)
- Add a URL link
- Schedule a starting date
- Add a subsequent banner by clicking on (+ Add design) – this allows you to replace the active banner with a new one at a set date and time.
The best part? Email signatures targeted in the campaign will update automatically—no user action is required. This feature ensures that even if an email was sent months or years ago, when the recipient opens it, the banner will always display the most up-to-date information, making it a powerful marketing tool.
6. Final step - initial setup for users
Ensure a swift implementation by enabling automatic updates based on the email client your team uses:
- New Outlook users – Set up the signature automatically Guide Link
- Classic Outlook users – Initial setup required Guide Link
- Gmail users – Automatic update in a few simple steps Guide Link
- Other email clients – Set up using HTML code List of instructions

Conclusion
By following these steps, you ensure a smooth and successful email signature project rollout. Proper preparation, branding consistency, and automated deployment will help maintain a professional corporate identity in all communications. Need help? Our team is always available to assist with custom designs and deployment solutions!
The entire process typically takes only 2 to 3 working days, but for smaller teams, it can be fully rolled out within hours!

